 Save
Save There's a photograph somewhere in my kitchen drawer of my grandmother's hands dusted with cocoa powder, a Black Forest Cake sitting lopsided on the counter behind her. I must have been eight, visiting her apartment in Stuttgart for the summer, and she'd promised me something special for dessert that night. What I didn't know was that watching her layer those chocolate cakes with cherry filling and whipped cream would become one of those memories that sticks with you forever—not because it was perfect, but because it tasted like love, like patience, like the kind of care you can actually feel on your tongue.
I made this cake for my best friend's birthday three years ago, and I still remember how quiet the dinner table got when I brought it out. She'd mentioned once, maybe a year earlier, that she'd always wanted to try authentic Black Forest Cake but had never found one that didn't taste like it came from a grocery store. The way her face lit up when she took that first bite—that moment felt like I'd given her something way more valuable than just dessert.
Ingredients
- All-purpose flour (1 cup): This is your structure, the backbone that keeps everything standing tall; don't skip sifting it with the dry ingredients or you'll end up with dense pockets instead of tender crumb.
- Unsweetened cocoa powder (1/2 cup): This is where the real chocolate flavor lives, not the sugar—use good quality powder and you'll taste the difference immediately.
- Granulated sugar (1 cup): It's not just sweetness; it also tenderizes the cake and helps trap moisture, so don't reduce it thinking you're being healthy.
- Baking powder and baking soda (1 1/2 tsp and 1/2 tsp): These two work together to lift the cake, and they're fussy about precision—too much and you'll taste metallic, too little and you've got a brick.
- Eggs (2 large): Room temperature is non-negotiable here; cold eggs won't incorporate properly and you'll lose all that lift you worked for.
- Vegetable oil (1/2 cup): Oil keeps the cake moist longer than butter would, which matters when you're layering and chilling.
- Boiling water (1/2 cup): This seems strange, but it's the secret to intensifying that chocolate flavor and creating a tender crumb.
- Heavy whipping cream (2 cups): Must be genuinely cold—pull it from the fridge 30 minutes before you need it and chill your bowl and beaters too.
- Dark sweet cherries (2 cups): If you're using fresh, pit them the day before so you're not standing in your kitchen frantically de-pitting on cake day.
- Kirsch or cherry brandy (2 tbsp, optional): This adds a sophistication that non-alcoholic versions can't quite capture, but if you skip it, use a bit more cherry syrup instead.
- Dark chocolate (3 oz for shavings): Cold chocolate shaves cleanly—keep it in the fridge and use a sharp vegetable peeler or microplane.
Tired of Takeout? 🥡
Get 10 meals you can make faster than delivery arrives. Seriously.
One email. No spam. Unsubscribe anytime.
Instructions
- Prepare Your Stage:
- Preheat that oven to 350°F and get your pans ready—grease them generously, line with parchment, and set them on the counter where you can see them. This is your signal to your brain that you're committed to the next 45 minutes.
- Build Your Base:
- Sift your dry ingredients together, and don't rush this step; you're aerating as you go, building little pockets of air that will make the cake tender. Take your time, even though it feels fussy.
- Mix with Intention:
- Add your wet ingredients and beat until smooth, watching the batter transform from thick to silky. When you add that boiling water, don't panic—the batter will seem impossibly thin, but that's exactly what you want.
- Bake and Breathe:
- Divide the batter evenly between pans (an ice cream scoop helps here) and slide them into the oven. Set a timer for 32 minutes and resist the urge to open that door until you absolutely have to peek.
- Cool Down:
- Let the cakes cool in their pans for 10 minutes—this is crucial because they're still setting. Then turn them out onto wire racks where they can breathe, and let them cool completely, which usually takes about an hour.
- Build the Cherry Magic:
- Combine your cherries, juice, and sugar in a saucepan and bring it to a gentle simmer, then stir in that cornstarch slurry to thicken it into glossy, spoil-able sauce. When it's done, add your kirsch if you're using it and let it cool completely—warm filling will turn your whipped cream into soup.
- Whip Your Clouds:
- Using a chilled bowl and beaters, whip your cold cream with powdered sugar and vanilla until you've got stiff peaks that hold their shape like little mountains. This usually takes 2-3 minutes on high speed once you start.
- Slice and Strategy:
- Take your cooled cake layers and, using a serrated knife and a gentle sawing motion, slice each one in half horizontally to create four layers total. This is where patience and a steady hand matter more than knife sharpness.
- Layer Like You Mean It:
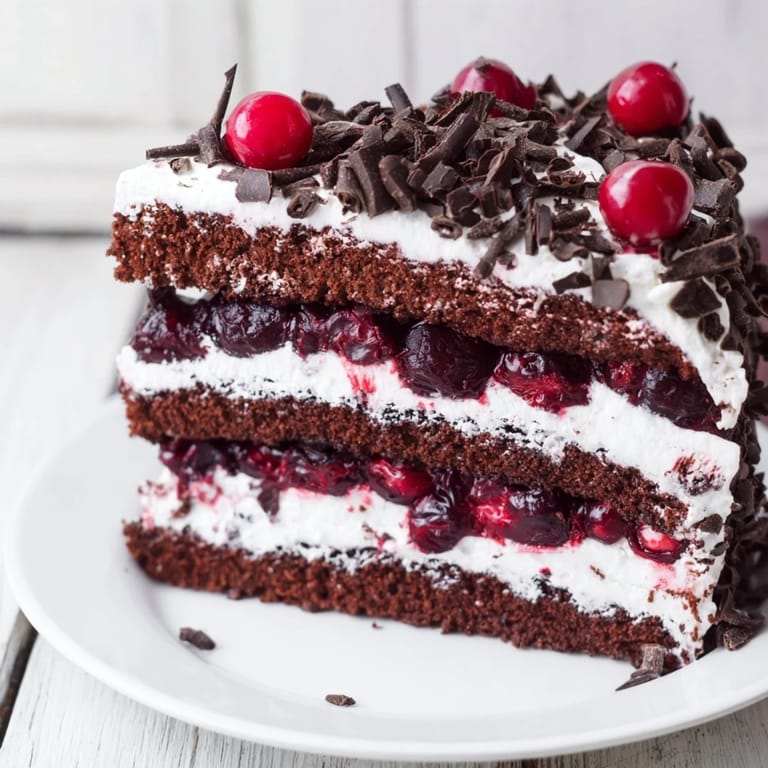
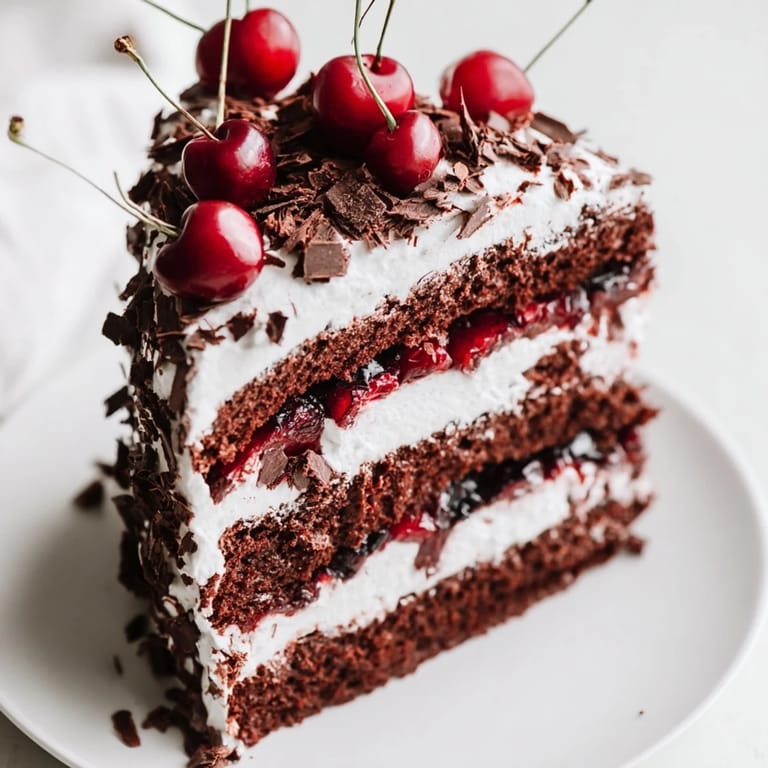
- Place your first layer on a serving plate, brush it lightly with some of that cherry syrup, spread a thin layer of cherry filling, then top with a layer of whipped cream. Repeat until you run out of layers, ending with whipped cream on top.
- Finish and Chill:
- Scatter chocolate shavings across the top and sides, nestle some extra cherries into the whipped cream, then slide the whole thing into the fridge for at least an hour. This chilling time lets everything set and actually makes it easier to slice.
 Save
Save I learned something important the second time I made this cake: it's not about perfection, it's about showing up for people. My layers weren't even that year, some of the whipped cream slid a little when I was frosting, and one of the chocolate shavings fell on the floor. But when my partner cut into it and found those dark cherries suspended in cream and chocolate, he smiled at me like I'd just handed him something precious.
The Story Behind This Cake
Black Forest Cake comes from the Black Forest region of Germany, and it's got the kind of pedigree that makes it feel important in a kitchen. But here's what they don't always tell you: it became famous not because it's difficult, but because when you get it right, it tastes like celebration. The combination of cherries, chocolate, and cream is so straightforward, so honest, that it somehow became elegant just by existing for long enough.
Making It Your Own
The beauty of this cake is that it's flexible enough to adapt to what you've got on hand or what you're craving. If you can't find fresh cherries, jarred ones work beautifully—in fact, many German bakers swear by sour cherries in light syrup for the truest flavor. If alcohol isn't your thing, skip the kirsch entirely and just use more of that cherry syrup, and the cake will still be absolutely delicious, just slightly less sophisticated.
The Assembly That Matters
This is where the magic actually happens, and it's worth taking your time with it. The key is building your layers systematically, brushing each cake layer with a little of that cherry syrup before you add filling and cream—it keeps the cake moist and adds subtle flavor depth. When you get to the top, don't overthink the decorating; chocolate shavings scattered casually and a few cherries nestled in look far more sophisticated than anything too neat would.
- Chill your finished cake for at least an hour before slicing so the layers actually hold together when you cut through them.
- Use a hot, wet knife and wipe it clean between each slice for clean edges that look bakery-worthy.
- Serve it slightly cool, not ice-cold, so you can actually taste all the nuance in that chocolate and cherry combination.
 Save
Save This cake is worth the effort, not because it's flashy, but because it's honest and beautiful and it reminds you why you learned to cook in the first place. Make it for someone you love, or make it for yourself on a day when you deserve to feel like royalty in your own kitchen.
Questions & Answers
- → What type of cherries work best?
Dark sweet pitted cherries, fresh or jarred and well-drained, provide a rich flavor and ideal texture for the filling.
- → Can kirsch be omitted?
Yes, kirsch is optional and can be left out for a non-alcoholic version without compromising flavor.
- → How do I achieve stiff whipped cream peaks?
Use cold heavy cream and beat on high speed until firm peaks form to ensure stability for layering and topping.
- → What's the best way to make chocolate shavings?
Run a vegetable peeler over a cold dark chocolate bar for fine, elegant shavings perfect for decoration.
- → How long should the layers cool before assembly?
Allow cake layers to cool completely on wire racks to prevent melting the whipped topping during assembly.